Faucet Installation Mistakes That Cause Leaks DIY Red Flags
Hard water creates faucet problems that feel mysterious at first because the damage happens slowly and mostly out of sight.
Faucet leaks that appear days or weeks after installation almost always trace back to small mistakes made during the installation itself. DIY faucet installation feels approachable because the parts are visible and the steps seem logical, but faucets operate under constant pressure and rely on precise alignment, sealing, and material limits. Minor errors that do not cause immediate dripping often create stress points that fail later, long after the installer has moved on. By the time water shows up under the sink or around the base, the original mistake is easy to overlook.
Installation-related leaks behave differently from normal wear failures. They tend to worsen gradually, appear intermittently, or show up only under certain conditions, such as high flow or temperature changes. Recognizing common DIY red flags helps homeowners identify when a leak comes from an installation error rather than a defective faucet or worn part. Understanding these mistakes also explains why tightening, resealing, or swapping parts often fails to solve the problem.
Overtightening Mounting Hardware And Cracking Surfaces
Overtightening remains one of the most common DIY faucet installation mistakes. When a faucet feels slightly loose, the instinct is to tighten mounting nuts aggressively until movement disappears. This approach creates uneven pressure against porcelain sinks, stone countertops, or thin metal decks. These materials do not flex evenly, so excessive force concentrates stress at specific points.
Over time, that stress causes hairline cracks in sink decks, distorts faucet bodies, or compresses gaskets beyond their design limits. Leaks often appear weeks later as materials relax or crack under pressure changes. Once damage occurs, tightening further only accelerates failure. Proper installation stops tightening once the faucet is stable and sealed, not when resistance peaks.
Poor Sink Deck Preparation Before Installation
A clean, flat mounting surface is essential for proper sealing. DIY installations often skip thorough cleaning of old putty, mineral deposits, or corrosion around faucet holes. When debris remains, gaskets cannot seat evenly, and small gaps form beneath the faucet base.
These gaps allow water to migrate under the faucet during use and seep into cabinetry below. Because the leak follows the underside of the sink deck, it may not appear near the faucet itself. Reapplying sealant on top rarely fixes the issue because the problem lies beneath the mounting surface. Proper preparation involves removing residue completely and drying the area before setting the faucet.
Using The Wrong Sealant Or Too Much Of It
Sealant misuse creates delayed leaks that confuse homeowners. Some faucets require gaskets rather than plumber’s putty or silicone. Adding sealant where a gasket already exists prevents proper compression and creates uneven pressure points.
Excess sealant also causes problems. Thick layers prevent the faucet from sitting flush and encourage over-tightening to compensate. Over time, the sealant compresses or shifts, breaking the seal and allowing water through. Following manufacturer instructions precisely matters more than adding extra material. More sealant rarely means better protection.
Reusing Old Supply Lines And Valves
Reusing existing supply lines and shut-off valves remains a major DIY red flag. These components experience constant pressure and degrade internally over time. Disturbing them during faucet replacement often triggers leaks that did not exist before.
Old supply lines may seal initially, then fail once pressure cycles resume. Aging valves may begin leaking around the stem after being turned for the first time in years. These leaks often get blamed on the new faucet because water appears shortly after installation. Replacing supply lines and evaluating valves during installation prevents misdiagnosis and repeat repairs.
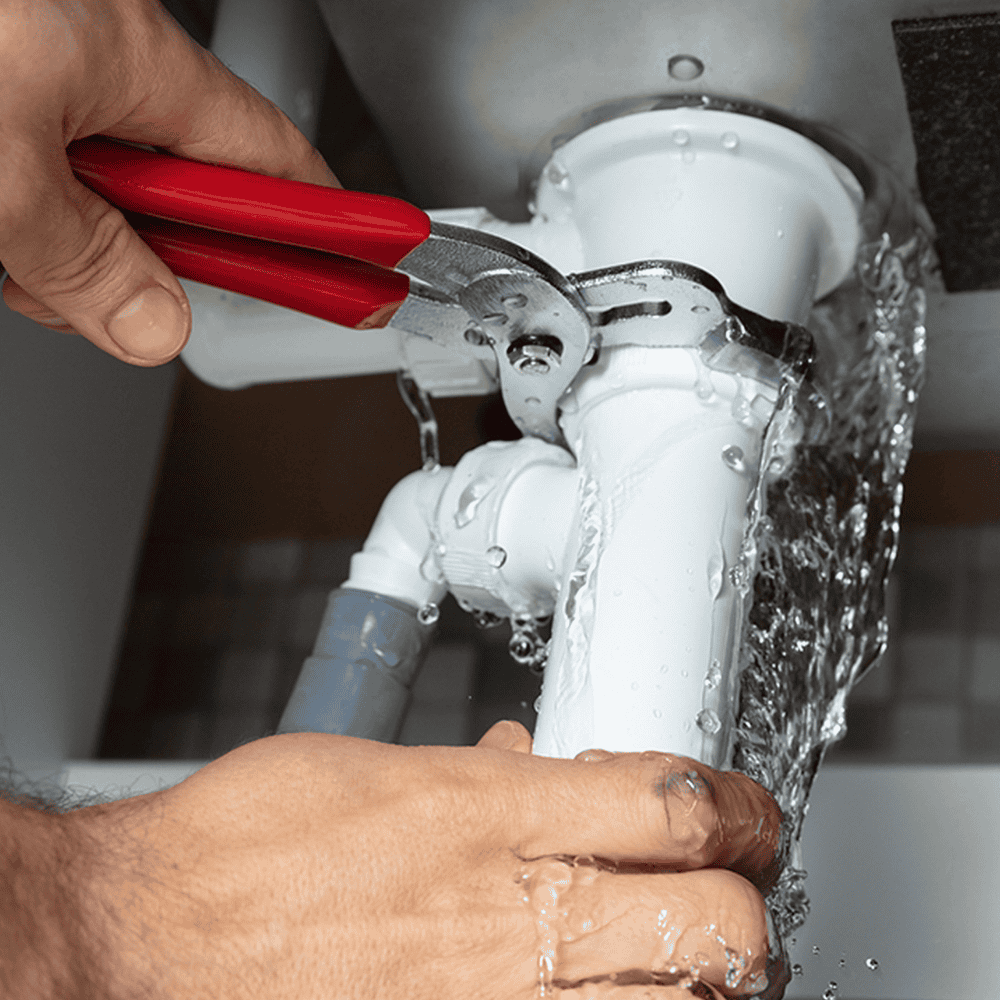
Cross Threading Or Misaligning Connections
Threaded connections require careful alignment. DIY installers sometimes force fittings that do not thread smoothly, damaging threads or distorting washers. Cross-threaded connections may seal temporarily, but they rarely hold under long-term pressure.
Leaks from these mistakes often appear intermittently, especially during temperature changes or high flow. Tightening worsens the damage by crushing washers or splitting fittings. Proper technique involves hand threading first to confirm alignment before tightening gently. Resistance early in threading signals a problem that needs correction before proceeding.
Ignoring Faucet Hose Routing And Clearance
Modern faucets with pull-down or pull-out hoses introduce routing challenges. DIY installations often overlook how hoses move beneath the sink. Tight bends, kinks, or interference with stored items create constant stress on hoses and connections.
Over time, internal liners fail and spray water inside the cabinet. Because the faucet works normally above the sink, the leak remains hidden until damage appears. Proper installation confirms smooth hose movement with no snags or sharp bends throughout its full range of motion.
Improper Drain Assembly Installation
Drain leaks frequently accompany DIY faucet installs because attention stays focused on the faucet itself. Misaligned drain flanges, overtightened gaskets, or mismatched components allow water to escape beneath the sink during use.
These leaks often appear only when the sink drains full basins of water, making them easy to miss initially. Water follows the drain body into the cabinets and floors. Proper drain installation requires even seating, correct washer order, and careful tightening rather than force.
Skipping Pressure Awareness During Installation
High water pressure magnifies installation mistakes. DIY installers rarely check pressure before installation. Excess pressure stresses seals, hoses, and valves immediately after the faucet goes into service.
Symptoms include leaks that appear only during high flow or after other fixtures run. New components fail prematurely because pressure exceeds their tolerance. Managing pressure protects the installation and prevents repeated failures that seem unrelated to the original work.
Failing To Test Thoroughly After Installation
Many DIY leaks could be avoided with proper testing. Running the faucet briefly and checking for obvious drips is not enough. Leaks often appear under sustained pressure, temperature change, or specific handle positions.
Proper testing includes running hot and cold water at full flow, cycling handles repeatedly, inspecting all connections, and rechecking after shutdown. Moisture that dries quickly still causes damage over time. Skipping thorough testing leaves small leaks undiscovered until cabinets swell or mold develops.
Why DIY Installation Leaks Often Appear Later
Delayed leaks frustrate homeowners because the installation seemed successful initially. Stress-related failures develop gradually as materials compress, shift, or crack. Pressure cycles exploit small weaknesses that were invisible during installation.
These failures often get misattributed to faulty products rather than the technique. Understanding the delayed nature of installation mistakes helps homeowners connect leaks back to their source and avoid repeating the same errors during repairs.
When Professional Help Prevents Bigger Problems
Professional installation focuses on prevention as much as attachment. Evaluating valves, pressure, surface condition, and routing prevents the small mistakes that lead to expensive water damage. Professionals recognize when tightening is harmful and when replacement of supporting components is necessary.
DIY installation can succeed with preparation and restraint, but knowing the red flags helps homeowners decide when professional help reduces risk. Avoiding these common mistakes protects fixtures, cabinets, and flooring long after the faucet is installed.
FAQs
Delayed leaks usually result from overtightening, poor surface preparation, or stressed components that fail over time.
No. Old supply lines increase leak risk and often fail shortly after being disturbed.
No. Excess sealant prevents proper seating and often causes leaks later.
Intermittent leaks often relate to pressure, temperature changes, or stressed connections that open under certain conditions.
If valves are old, pressure is unknown, or the sink surface is fragile, professional installation helps prevent costly mistakes.
Trust Adaven Plumbing for an effectively and efficiently functioning residential plumbing system. We offer drain cleaning, water leak detection and repair, toilet repairs, home repiping, faucet repair and replacement, and plumbing maintenance solutions in Las Vegas. We have a team of licensed technicians who deliver quality work and 24-hour emergency assistance. Call today to schedule a free onsite estimate.